Building a distributed Task scheduling and execution system with NestJs, Docker, and RabbitMQ (Part 1)


Introduction
In software systems and applications, there is often a requirement to execute specific tasks either at a predetermined future time or on a recurring basis, such as a daily 10 AM operation. For instance, these tasks could involve sending daily emails to users celebrating their birthdays on a given day, issuing notifications to remind users of upcoming scheduled tasks at specific times, and more.
An application intending to perform such actions, especially on a large scale with millions of users, necessitates the implementation of a distributed job scheduling and execution system. Distributed job schedulers are specialized software tools capable of initiating scheduled jobs or workloads across multiple servers. The scheduler assigns these subtasks to different machines within the distributed system, considering factors like available resources, workload, priority, or any other relevant metrics.
These systems are highly scalable, allowing the system to efficiently manage an increasing number of tasks or machines as required. A job scheduling and execution system typically comprises two core components:
The scheduling system, responsible for ensuring that jobs are queued and executed in a timely manner.
The execution system, which retrieves jobs from the queue and executes them.
The motivation behind composing this article and providing a step-by-step account of my implementation stems from my personal journey of delving into job scheduling systems. I embarked on this while working on a side project, recognizing the need for such systems. Although I encountered numerous valuable articles delving deeply into the theoretical aspects of building such systems and considerations to be mindful of, I found limited practical examples and implementations.
As someone relatively new to the process, I wanted to see more practical demonstrations and implementations to better understand how they are implemented. Consequently, after extensive research and coming up with my own implementation based on articles that talked about the theories of implementing such systems , I decided to document the process. My goal is to offer insights into how I developed a functional system, acknowledging its imperfections, with the aim of aiding others in their learning journey.
Overall System Requirements
In this section, we will outline the fundamental requirements that are crucial for the successful development and deployment of our distributed job scheduling and execution system. These requirements will lay the groundwork for its functionality and scalability.
Create/Delete jobs
Query jobs
On time job execution
Job execution retries
System Architecture
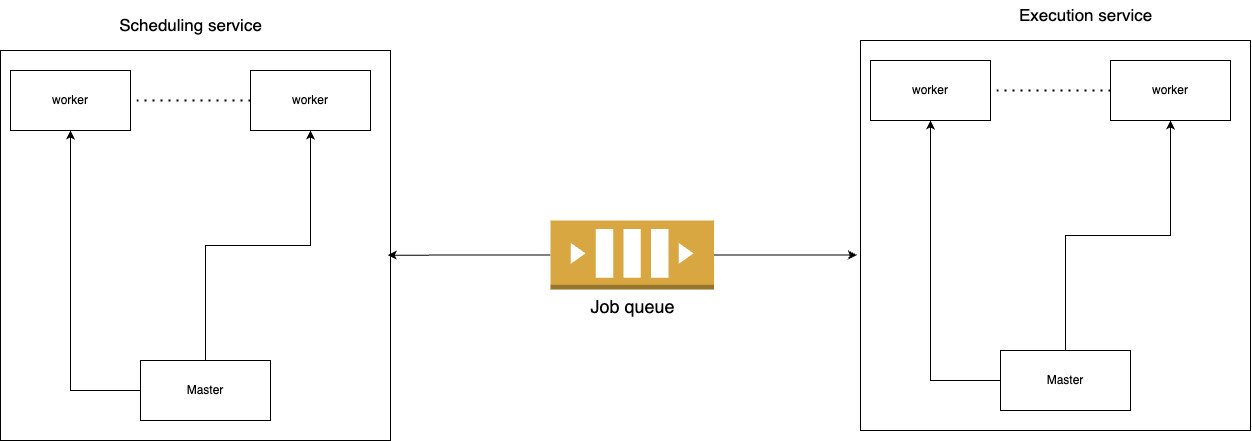
Scheduling service: The scheduling service exposes an API that allows users to create, delete, and query jobs. The scheduling service is also responsible for pushing due jobs to the queue in a timely manner.
Queue: The queue stores the jobs that are due for excecution. Jobs are retrieved from the queue by the execution service.
Execution service: The execution service is responsible for retrieving jobs from the queue and executing them. The execution service also handles job execution retries.
Designing the Scheduling Service
Database design: Schema
Job table
The job table stores the details of the jobs that are created by the users. The job table has the following columns:
Job Id: The unique identifier of the job.
Job Type: The type of the job, whether it is a one-time job or a recurring job.
Scheduled Time: This is the time at which the job is scheduled to begin its first execution. While this field is primarily applicable for one-time jobs, it can also be used for recurring jobs to specify the time at which the first execution should commence.
Interval (in seconds): This is the interval at which the job should be executed. This field is only applicable for recurring jobs. The interval is used to calculate the next execution time of the job.
Data: This is the data that is required for the execution of the job. This field is optional and can be used to store any data that is required for the execution of the job.
| Job Id | Job Type | Scheduled Time | Interval (in seconds) | Data |
| 1 | One-time | 2021-01-01 10:00:00 | null | { job-name: "send-birthday-email", user-id: 1 } |
| 2 | Recurring | 2021-01-01 10:00:00 | 86400 | { job-name: "daily-goodmorning-notification", user-id: 1 } |
In the above example, job 1 is a one-time job that is scheduled to execute at 10 AM on 1st January 2021. Job 2 is a recurring job that is scheduled to execute at 10 AM on 1st January 2021 and every 24 hours thereafter.
Schedule Table
The job schedule table consists of a data model that makes it easy to query for jobs that are due for execution. The job schedule table has the following columns:
Job Id: The unique identifier of the job.
Next Execution Time: The time at which the job is due for execution.
Queued: A boolean flag that indicates whether the job has been pushed to the queue.
Shard: A partitioning key that is used to distribute the jobs across multiple workers.
| Job Id | Next Execution Time | Queued | shard |
| 1 | 1679190400 | false | 2 |
| 2 | 1679190400 | false | 1 |
The scheduling service operates by executing a query every minute to identify jobs that are currently due for execution. Specifically, this query retrieves jobs with a next execution time less than or equal to the current time while also ensuring they haven't been queued yet. Once these jobs are identified, the scheduling service proceeds to enqueue them and updates the 'queued' flag to true.
To achieve this, we store the next execution time as a UNIX timestamp with minute-level precision, eliminating seconds and milliseconds to round each execution time down to the nearest minute. This meticulous timestamp storage enhances the efficiency of querying for jobs that are ready to run. Utilizing UNIX timestamps, as opposed to date-time formats, mitigates the inefficiencies associated with date-time comparisons in queries and allows for streamlined querying based on a range of timestamps.
For example, to obtain jobs that are scheduled to run, you can execute a query like the one below:
SELECT * FROM job_schedule WHERE next_execution_time <= 1679190400 AND queued = false AND shard = 1;
Here, 1679190400 represents the current time in UNIX timestamp format.
The significance of the 'shard' concept becomes evident in optimizing job distribution across multiple workers. Sharding acts as a partitioning key to allocate jobs to distinct worker instances, ensuring that the same job is not concurrently handled by multiple workers. For instance, if we have three workers, we can assign each worker a unique shard value (e.g., 1, 2, and 3). When a worker selects a job, it updates the job's shard value to match its own. This mechanism guarantees that no job is processed by multiple workers simultaneously.
Beyond preventing job duplication, sharding evenly disperses jobs among workers, preventing any single worker from being overwhelmed with an excessive workload.
To illustrate, if we have three workers in the scheduling service, each worker performs its queries as follows:
Worker 1:
SELECT * FROM job_schedule WHERE next_execution_time <= 1679190400 AND queued = false AND shard = 1;Worker 2:
SELECT * FROM job_schedule WHERE next_execution_time <= 1679190400 AND queued = false AND shard = 2;Worker 3:
SELECT * FROM job_schedule WHERE next_execution_time <= 1679190400 AND queued = false AND shard = 3;
The shard assignment is done randomly for each job schedule during job creation, ensuring equitable job distribution across the available workers.
Implementing the Scheduler Service
Tech Stack
We will utilize
NestJSto build our scheduling service. NestJS is a Node.js framework that offers a structured approach for creating scalable and maintainable server-side applications. It is built on top of Express and offers a wide range of features.We will employ
MongoDBfor storage. MongoDB is a NoSQL database that features a flexible data model and is particularly well-suited for storing JSON-like documents.As the message broker, we have chosen
RabbitMQ. RabbitMQ implements the Advanced Message Queuing Protocol (AMQP) and is known for its robustness and scalability, making it an excellent choice for distributed systems.Our application will be containerized using
Docker. Docker is a containerization platform that allows us to package both our application and its dependencies into containers. These Docker containers are lightweight and portable, making them an ideal choice for deploying applications.
It's worth noting that although we're employing this specific tech stack, you have the flexibility to choose any stack that suits your requirements. The concepts and ideas presented in this article are not tied to any particular technology stack.
Additionally, I want to emphasize that I won't delve into the implementation of certain low-level infrastructure components. Instead, we'll be using high-level abstractions specific to our implementation. Rest assured, the final code will encompass all the necessary infrastructure components. This approach allows us to focus on the core concepts of the system. The completed code can be accessed here
Lastly, it's important to mention that this article assumes readers' familiarity with these technologies, and as a result, we'll skip some setup details.
Let's get started.
Starter files
You do not need to actively code along with the content of this article. The primary focus of this article is to provide a high-level code overview of the system and its various components. However, if you wish to follow along and work on the code, you can access the starter files by clicking here.
The starter files include the following components:
env.example: This file contains the essential environment variables required for the application to function. To use it, simply make a copy of this file and rename it to ".env". The values in this file are already pre-filled, but you can modify them according to your specific needs.
docker-compose.yml: This file comprises the Docker Compose configuration for the application. It defines the following services:
mongodb: This service is responsible for running the MongoDB database.
rabbitmq: This service is responsible for operating the RabbitMQ server.
scheduler: This service manages the scheduling functionality.
worker: This service handles worker tasks. The Docker Compose file instantiates six instances of the worker service. You can adjust this number to match your requirements.
package.json: Within this file, you'll find a
startscript that is used to launch the application. To run the application, execute the following command in your terminal:npm start
Feel free to refer to the starter files and explore the code as you see fit, but it's not necessary to follow along with the code while reading this article.
Creating the NestJS application
We will commence by creating a new NestJS application using the Nest CLI. To do this, execute the following command:
nest new scheduler
In our application, we'll also establish the following modules:
Job module: This module will manage various job-related operations, including job creation, deletion, and job queries.
Master module: This module will serve as the core for orchestrating tasks across multiple workers.
Worker module: Responsibility for pushing jobs to the execution queue lies with this module.
To create these modules, execute the corresponding commands:
nest g module job
nest g module master
nest g module worker
we can also go ahead an create the corresponding controllers and services for each module:
nest g controller job
nest g service job
nest g controller master
nest g service master
nest g controller worker
nest g service worker
Dockerfile setup
# src/Dockerfile

FROM node:19 AS deps
WORKDIR /app
COPY package.json .
RUN npm install
FROM node:19 AS builder
WORKDIR /app
COPY --from=deps /app/node_modules ./node_modules
COPY . .
RUN npm run build && npm cache clean --force
EXPOSE 3000
CMD ["npm" ,"run","start:dev"]
Master and Worker microservice setup
In src/main.ts, our primary objective is to initialize both the master and worker microservices while configuring their respective transport methods. The choice of a transport method is of paramount importance, as it fundamentally dictates how these microservices communicate with each other.
To establish a seamless connection between the master and worker instances, we will harness the power of NestJs microservices classes. These classes provide a wide array of communication protocols, encompassing TCP, Redis, gRPC, RabbitMQ, Kafka, and more. In our particular context, RabbitMQ will be our transport method of choice.
For those who may not be well-versed in NestJs microservices, you can explore a wealth of information in the official documentation here. This resource offers an in-depth understanding of the functionalities and capabilities provided by NestJs microservices.
Before we proceed with the setup in the main.ts file, it's important to note that in the worker.service.ts file, we will need to export a unique ID generated for each worker instance. This ID serves the dual purpose of identifying the worker instance and playing a pivotal role in initializing the worker's transport method in the src/main.ts file.
//src/worker/worker.service.ts

import { randomUUID } from 'crypto';
export let workerId = randomUUID();
//.. other codes
//src/main.ts

import { NestFactory } from '@nestjs/core';
import { MasterModule } from './master/master.module';
import mongoose from 'mongoose';
import { Transport } from '@nestjs/microservices';
import { DocumentBuilder, SwaggerModule } from '@nestjs/swagger';
import { WorkerModule } from './worker/worker.module';
import { workerId } from './worker/worker.service';

async function bootstrap() {
  mongoose.connect(
    process.env.DB_URL,
    {
      retryWrites: false,
    },
    async (err) => {
      if (err) {
        console.log(err);
      } else {
        const schedulerNode = process.env.SCHEDULER_NODE;
        let app: INestApplication;

        if (schedulerNode === 'master') {
          app = await NestFactory.create(MasterModule);
          app.connectMicroservice({
            transport: Transport.RMQ,
            options: {
              urls: [process.env.AMPQ_URL],
              queue: 'scheduler_master_queue',
              queueOptions: {
                durable: false,
              },
            },
          });

          await app.startAllMicroservices();
          await app.listen(3000);
        } else {
          app = await NestFactory.create(WorkerModule);
          app.connectMicroservice({
            transport: Transport.RMQ,
            options: {
              urls: [process.env.AMPQ_URL],
              queue: `${workerId}-queue`,
              queueOptions: {
                durable: false,
              },
            },
          });

          await app.startAllMicroservices();
          await app.listen(3000);
        }
      }
    },
  );
}
bootstrap();
In the provided code snippet, we have created a new NestJS application and initiated both the master and worker microservices. The master microservice is initialized with the queue name scheduler_master_queue, which serves as the channel through which workers can send messages to the master. Simultaneously, the worker microservice is initialized with a dynamically generated queue name ${workerId}-queue, where workerId is a unique identifier. This queue name plays a dual role: it designates the queue that the worker microservice listens to and acts as the target for the master to send commands to the worker.
Additionally, the environment variable process.env.SCHEDULER_NODE serves as an identifier to distinguish whether the current node is functioning as a master or a worker within the system. The value of this variable is typically configured in the docker-compose file.
Master module
To orchestrate operation of workers, the master needs to be able to do the following:
Register workers
Assign shards to workers
Receive heartbeats from workers: Heartbeats are used to determine whether a worker is still alive. If a worker fails to send a heartbeat within a specified time interval, the master will assume that the worker is no longer alive and will reassign its shards to other workers.
Send queue commands to workers: The master will send commands to workers to push jobs to the queue.
Let's begin by creating a new class that will represent the worker.
//src/worker/worker.model.ts

export class Worker {
  id: string;
  shards: number[];
  lastHeartbeat: Date;
  connectedAt: Date;

  constructor(params: {
    id: string;
    shards: number[];
    lastHeartbeat: Date;
    connectedAt: Date;
  }) {
    this.id = params.id;
    this.shards = params.shards;
    this.lastHeartbeat = params.lastHeartbeat;
    this.connectedAt = params.connectedAt;
  }

  public addShard(shard: number) {
    this.shards.push(shard);
  }

  public updateShards(shards: number[]) {
    this.shards = shards;
  }

  public updateLastHeartbeat(date: Date) {
    this.lastHeartbeat = date;
  }
}
Next we create a couple of methods that will handle shard assignment
// src/master/master.service.ts

let workers: Worker[] = [];
export const assignableShardLength = 5;
const shardStatus: Map<number, boolean> = new Map();

@Injectable()
export class MasterService {
  getNextShard(): number {
    //return the first unassigned shard
    for (let [shard, assigned] of shardStatus) {
      if (!assigned) {
        return shard;
      }
    }

    //if all shards are assigned and a worker has more than 1 shard, unassign a shard and return it
    const worker = workers.find((worker) => worker.shards.length > 1);
    if (worker) {
      let shard = worker.shards[0];
      this.unAssignShard(shard);
      return shard;
    }

    //if all shards are assigned, return -1
    return -1;
  }

  unAssignShard(shard: number) {
    const worker = workers.find((worker) => worker.shards.includes(shard));
    if (worker) {
      worker.updateShards(worker.shards.filter((s) => s !== shard));
    }
    shardStatus.set(shard, false);
  }

  assignShard(workerId: string, shard: number) {
    const worker = workers.find((worker) => worker.id === workerId);
    if (worker) {
      worker.addShard(shard);
    }
    shardStatus.set(shard, true);
  }
}
const assignableShardLength: This variable represents the number of shards. A value of 5 means that we have have shards assignable to the workers. This value can be later changed to any value as per our requirements.
shardStatus: This variable is a map that stores the status of each shard. A value of true indicates that the shard is assigned to a worker, while a value of false indicates that the shard is unassigned.
getNextShard: This method returns the next unassigned shard. If all shards are assigned, it returns the first shard of a worker that has more than one shard. If all shards are assigned and no worker has more than one shard, it returns -1.
unAssignShard: This method unassigns a shard from a worker.
assignShard: This method assigns a shard to a worker.
Within the service class, we'll create a couple of methods that will handle worker registration and heartbeat.
// src/master/master.service.ts

//... other code
import { Mutex } from 'async-mutex';
const mutex = new Mutex();

@Injectable()
export class MasterService {
  async addWorker(params: { workerId: string }): Promise<Worker> {
    const release = await mutex.acquire();

    try {
      if (workers.find((worker) => worker.id === params.workerId)) {
        return workers.find((worker) => worker.id === params.workerId);
      }

      const newWorker = new Worker({
        id: params.workerId,
        lastHeartbeat: new Date(),
        connectedAt: new Date(),
        shards: [],
      });

      workers.push(newWorker);
      let shard = this.getNextShard();
      this.assignShard(newWorker.id, shard);

      return newWorker;
    } catch (e) {
      console.log(e);
      throw e;
    } finally {
      release();
    }
  }

  registerHeartbeat(params: { workerId: string }): boolean {
    let worker = workers.find((worker) => worker.id === params.workerId);
    if (!worker) {
      return false;
    }
    worker.updateLastHeartbeat(new Date());
    return true;
  }

  //... other code
}
addWorker: This method is responsible for adding a new worker to the workers array. It not only assigns a shard to the worker but also ensures that multiple workers with the same id are not created. If a worker with the same id already exists, the method returns the existing worker. Otherwise, it creates a new worker and assigns it the next available shard using the getNextShard method. To prevent concurrent addition of workers, it leverages the async-mutex library, which implements mutual exclusion locks (mutex). This guarantees that only one worker is added at a time, which is crucial to avoid multiple workers being assigned the same shard.
registerHeartbeat: This method is responsible for updating the last heartbeat of a worker.
Now, we need to ensure that the master service montitors the heartbeats of the workers and reassigns shards if a worker fails to send a heartbeat within a specified time interval. To achieve this, we'll create a new method that will be executed every 5 seconds. The timing of this can be adjusted as per our requirements
// src/master/master.service.ts

//... other code
import { Cron } from '@nestjs/schedule';
@Injectable()
export class MasterService {
  //... other code
  @Cron('*/5 * * * * *')
  removeDeadWorkers() {
    const deadWorkers = workers.filter(
      //if the last heartbeat was more than 1 minute ago, consider the worker dead
      (worker) => new Date().getTime() - worker.lastHeartbeat.getTime() > 60000,
    );

    deadWorkers.forEach((worker) => {
      //unassign all shards of the dead worker
      worker.shards.forEach((shard) => this.unAssignShard(shard));
    });

    //remove dead workers from the workers array
    workers = workers.filter(
      (worker) => !deadWorkers.map((w) => w.id).includes(worker.id),
    );
  }
  //... other code
}
removeDeadWorkers: This method is executed every 5 seconds. It identifies workers that have not sent a heartbeat within the last minute and unassigns all their shards. It then removes the dead workers from the workers array.
To ensure efficient shard management after the removeDeadWorkers method has potentially unassigned available shards, we should implement a cleanup job. This job will be responsible for identifying unassigned shards and reassigning them to other workers. We would adhere to two key policies when reassigning these free shards:
Priority to Idle Workers: Initially, the cleanup job will prioritize assigning the free shard to an idle worker. An idle worker is defined as one that currently has no shards assigned to it. This approach ensures that we utilize idle resources before allocating more shards to busy workers.
Least Shard-Loaded Worker: In cases where no idle workers are available, the cleanup job will assign the free shard to a worker that has the least number of shards already assigned to it. This policy promotes load balancing across the workers and prevents any single worker from becoming overwhelmed with too many shards.
By implementing these two policies, we can efficiently manage and distribute shards among our worker pool, optimizing system performance and resource utilization.
// src/master/master.service.ts

//... other code
import { Cron } from '@nestjs/schedule';
@Injectable()
export class MasterService {
  //... other code
  @Cron('*/5 * * * * *')
  shardAssignment() {
    this._assignUnassignedShardsToIdleWorkers();
    this._assignUnassignedShardsToWorkersWithLowestShardCount();
  }

  private _assignUnassignedShardsToIdleWorkers() {
    let idleWorkers = workers.filter((worker) => worker.shards.length === 0);

    for (let [shard, status] of shardStatus) {
      if (!status && idleWorkers.length > 0) {
        const worker = idleWorkers.pop();
        this.assignShard(worker.id, shard);
      }
    }
  }

  private _assignUnassignedShardsToWorkersWithLowestShardCount() {
    let workersWithLowestShardCount = workers
      .filter((worker) => worker.shards.length > 0)
      .sort((a, b) => a.shards.length - b.shards.length);

    for (let [shard, status] of shardStatus) {
      if (!status && workersWithLowestShardCount.length > 0) {
        const worker = workersWithLowestShardCount.pop();
        this.assignShard(worker.id, shard);
      }
    }
  }
  //... other code
}
Now we have all the necessary methods to handle worker registration, shard assignment, and shard reassignment. We now need to create a service method that tells the workers to push jobs to the queue.
// src/master/master.service.ts

//... other code
import { ClientProxyFactory, Transport } from '@nestjs/microservices';
@Injectable()
export class MasterService {
  //... other code
  @Cron('*/1 * * * *')
  async dispatchQueueWorkCommand() {
    try {
      const activeWorkers = workers.filter(
        (worker) => worker.shards.length > 0,
      );

      for (let worker of activeWorkers) {
        const client = ClientProxyFactory.create({
          transport: Transport.RMQ,
          options: {
            urls: [process.env.AMPQ_URL],
            queue: `${worker.id}-queue`,
            queueOptions: {
              durable: false,
            },
          },
        });
        await client.connect();
        for (let shard of worker.shards) {
          Logger.log(
            `dispatching queue command to worker ${worker.id} for shard ${shard}`,
          );

          client
            .send<number>(
              { cmd: 'queueJobs' },
              {
                shard,
                timestamp: getUnixTimeStampMuniteGranularity(new Date()),
              },
            )
            .pipe(
              catchError((e) => {
                console.log(e);
                return of(false);
              }),
            )
            .subscribe((_) => {});
        }

        setTimeout(() => {
          client.close();
        }, 5000);
      }
    } catch (e) {
      console.log(e);
    }
  }
  //... other code
}
dispatchQueueWorkCommand: This method is scheduled to run every minute. Its primary purpose is to interact with active workers by dispatching queue commands. These queue commands consist of two crucial components: the shard identifier and the current timestamp.
The shard identifier serves as a reference for workers to discern which jobs are associated with their respective shards.
The timestamp plays a critical role in ensuring that each worker exclusively retrieves jobs that are due for execution at the current time.
It's worth noting that the specifics of how workers utilize these parameters to retrieve jobs from the database will be covered in the worker module, which will delve into the worker's responsibilities and logic.
For the present context, it's essential to understand how the master communicates with the worker to send these queue commands. The master leverages the ClientProxyFactory to facilitate this communication. It sends messages to the dedicated RabbitMQ queue of each worker, identified by the queue named ${worker.id}-queue. This queue is distinct from the one responsible for storing jobs and is exclusively reserved for receiving commands from the master.
The worker, in turn, actively listens to its designated queue and executes the queue commands received. This orchestration ensures a systematic and efficient distribution of tasks among the workers.
We have now completed the implementation of the master service. We would then need to implement the master controller. The master controller will expose an API that will allow workers to register themselves with the master.
import { Controller } from '@nestjs/common';
import { MessagePattern } from '@nestjs/microservices';
import { MasterService } from './master.service';

@Controller()
export class MasterController {
  constructor(private readonly masterService: MasterService) {}

  @MessagePattern({ cmd: 'registerWorker' })
  async registerWorker(params: { workerId: string }): Promise<boolean> {
    try {
      await this.masterService.addWorker(params);
      return true;
    } catch (err) {
      console.log(err);
      return false;
    }
  }

  @MessagePattern({ cmd: 'heartbeat' })
  heartbeat(params: { workerId: string }): boolean {
    try {
      return this.masterService.registerHeartbeat(params);
    } catch (err) {
      console.log(err);
      return false;
    }
  }
}
This concludes the implementation of the master module.
Job Module
We will dedicate less time to this module since it primarily involves CRUD (Create, Read, Update, Delete) operations, which are responsible for job creation and querying. Additionally, we'll need to create a job model to represent the job entity.
Job and Scheduled job Model
export enum JobType {
  RECURRING = 'recurring',
  ONE_TIME = 'one-time',
}

export class JobData {
  name: string;
  data: any;

  constructor(params: { name: string; data: string }) {
    this.name = params.name;
    this.data = params.data;
  }
}

export class Job {
  id: string;
  jobType: JobType;
  interval: number;
  scheduledTime?: Date;
  data: JobData;

  constructor(params: {
    id: string;
    jobType: JobType;
    interval: number;
    scheduledTime?: Date;
    data: JobData;
  }) {
    this.id = params.id;
    this.jobType = params.jobType;
    this.interval = params.interval;
    this.scheduledTime = params.scheduledTime;
    this.data = params.data;
  }
}

export class ScheduledJob {
  id: string;
  jobId: string;
  nextExecution: number;
  shard: number;
  queued: boolean;

  constructor(params: {
    id: string;
    jobId: string;
    nextExecution: number;
    shard?: number;
    queued?: boolean;
  }) {
    this.id = params.id;
    this.jobId = params.jobId;
    this.nextExecution = params.nextExecution;
    this.shard =
      params.shard || Math.floor(Math.random() * assignableShardLength) + 1;
    this._queued = params.queued || false;
  }
Note: The above classes have been condensed to include only what is relevant to this article. I have omitted certain validations and other methods that are not pertinent to the scope of this article. For a comprehensive understanding, you can refer to the complete code for more details.
Job and Scheduled job Repository
export abstract class JobRepository {
  abstract delete(job: Job): Promise<void>;
  abstract findById(jobId: string): Promise<Job>;
  abstract add(job: Job): Promise<void>;
}

export abstract class ScheduledJobRepository {
  abstract delete(schedule: ScheduledJob): Promise<void>;
  abstract update(scheduledJob: ScheduledJob): Promise<void>;
  abstract findById(jobId: string): Promise<ScheduledJob>;
  abstract add(newSchedule: ScheduledJob): Promise<void>;
  abstract getDueScheduledJobs(
    shard: number,
    timestamp: number,
  ): Promise<ScheduledJob[]>;
  abstract getSchedulesByJobId(jobId: string): Promise<ScheduledJob[]>;
}
Regarding the content above, let's restructure and correct it for clarity:
In the context of our discussion, we will primarily focus on the abstractions of these classes rather than delving into the specific concrete implementations. If you're actively coding along with this article, you can easily access the code for the jobs module from the repository to streamline your progress.
While we don't delve deeply into the nitty-gritty of implementing these classes, it's crucial to grasp the purpose and functionality of some key methods:
getDueScheduledJobs: This method plays a pivotal role in retrieving jobs that are scheduled for execution. It accepts two essential parameters: the shard identifier and the current timestamp. It effectively performs a query to fetch jobs that are scheduled for immediate execution and are associated with the specified shard. An illustrative query might resemble the following:
SELECT * FROM scheduled_jobs WHERE next_execution <= 1679190400 AND shard = 1 AND queued = false;
Job service and controller
// src/job/job.service.ts
@Injectable()
export class JobService {
  constructor(
    private jobRepository: JobRepository,
    private jobScheduleRepository: ScheduledJobRepository,
  ) {}

  async createJob(params: {
    jobType: string;
    interval: number;
    scheduledTime?: Date;
    data: {
      name: string;
      data: any;
    };
  }): Promise<Job> {
    let jobType = JobType.fromString(params.jobType);
    if (jobType == JobType.ONE_TIME && !params.scheduledTime) {
      throw new RequiredPropertyException('scheduledTime');
    }
    if (!params.data) {
      throw new RequiredPropertyException('data');
    }

    const job = new Job({
      jobType: jobType,
      interval: params.interval,
      id: randomUUID(),
      scheduledTime: params.scheduledTime,
      data: new JobData({
        name: params.data.name,
        data: params.data.data,
      }),
    });
    await this.jobRepository.add(job);

    if (jobType == JobType.RECURRING) {
      const jobSchedule = new ScheduledJob({
        jobId: job.id,
        nextExecution: getUnixTimeStampMuniteGranularity(
          new Date(Date.now() + params.interval * 1000),
        ),
        id: randomUUID(),
      });
      await this.jobScheduleRepository.add(jobSchedule);
    } else {
      const jobSchedule = new ScheduledJob({
        jobId: job.id,
        nextExecution: getUnixTimeStampMuniteGranularity(
          convertToServerTimeZone(new Date(params.scheduledTime)),
        ),
        id: randomUUID(),
      });
      await this.jobScheduleRepository.add(jobSchedule);
    }
    return job;
  }

  async markScheduledJobAsQueued(jobId: string): Promise<void> {
    const scheduledJob = await this.jobScheduleRepository.findById(jobId);
    scheduledJob.markAsQueued();
    await this.jobScheduleRepository.update(scheduledJob);
  }
}
createJob: This method is responsible for creating a new job. It accepts four essential parameters: the job type, the interval, the scheduled time, and the job data. The job type can be either recurring or one-time. The interval is the time in seconds between each execution of the job. The scheduled time is the time at which the job is scheduled to run. The job data is a JSON object that contains the name and data of the job. After creating the job, the method adds it to the job repository. If the job type is recurring, it also creates a new scheduled job and adds it to the scheduled job repository. If the job type is one-time, it creates a new scheduled job with the scheduled time and adds it to the scheduled job repository.
markScheduledJobAsQueued: This method is responsible for marking a scheduled job as queued. It accepts a single parameter: the job id. It retrieves the scheduled job from the scheduled job repository and marks it as queued. It then updates the scheduled job in the scheduled job repository.
The controller exposes an API that allows clients to create jobs.
export class JobController {
  constructor(private jobService: JobService) {}
  @Post()
  async createJob(@Body() request: CreateJobRequest): Promise<JobDto> {
    const job = await this.jobService.createJob({
      jobType: request.jobType,
      interval: request.interval,
      scheduledTime: request.scheduledTime,
      data: {
        name: request.data.name,
        data: request.data.data,
      },
    });
    return JobDto.fromDomain(job);
  }
  //.. other methods delete, get all and get by id
}
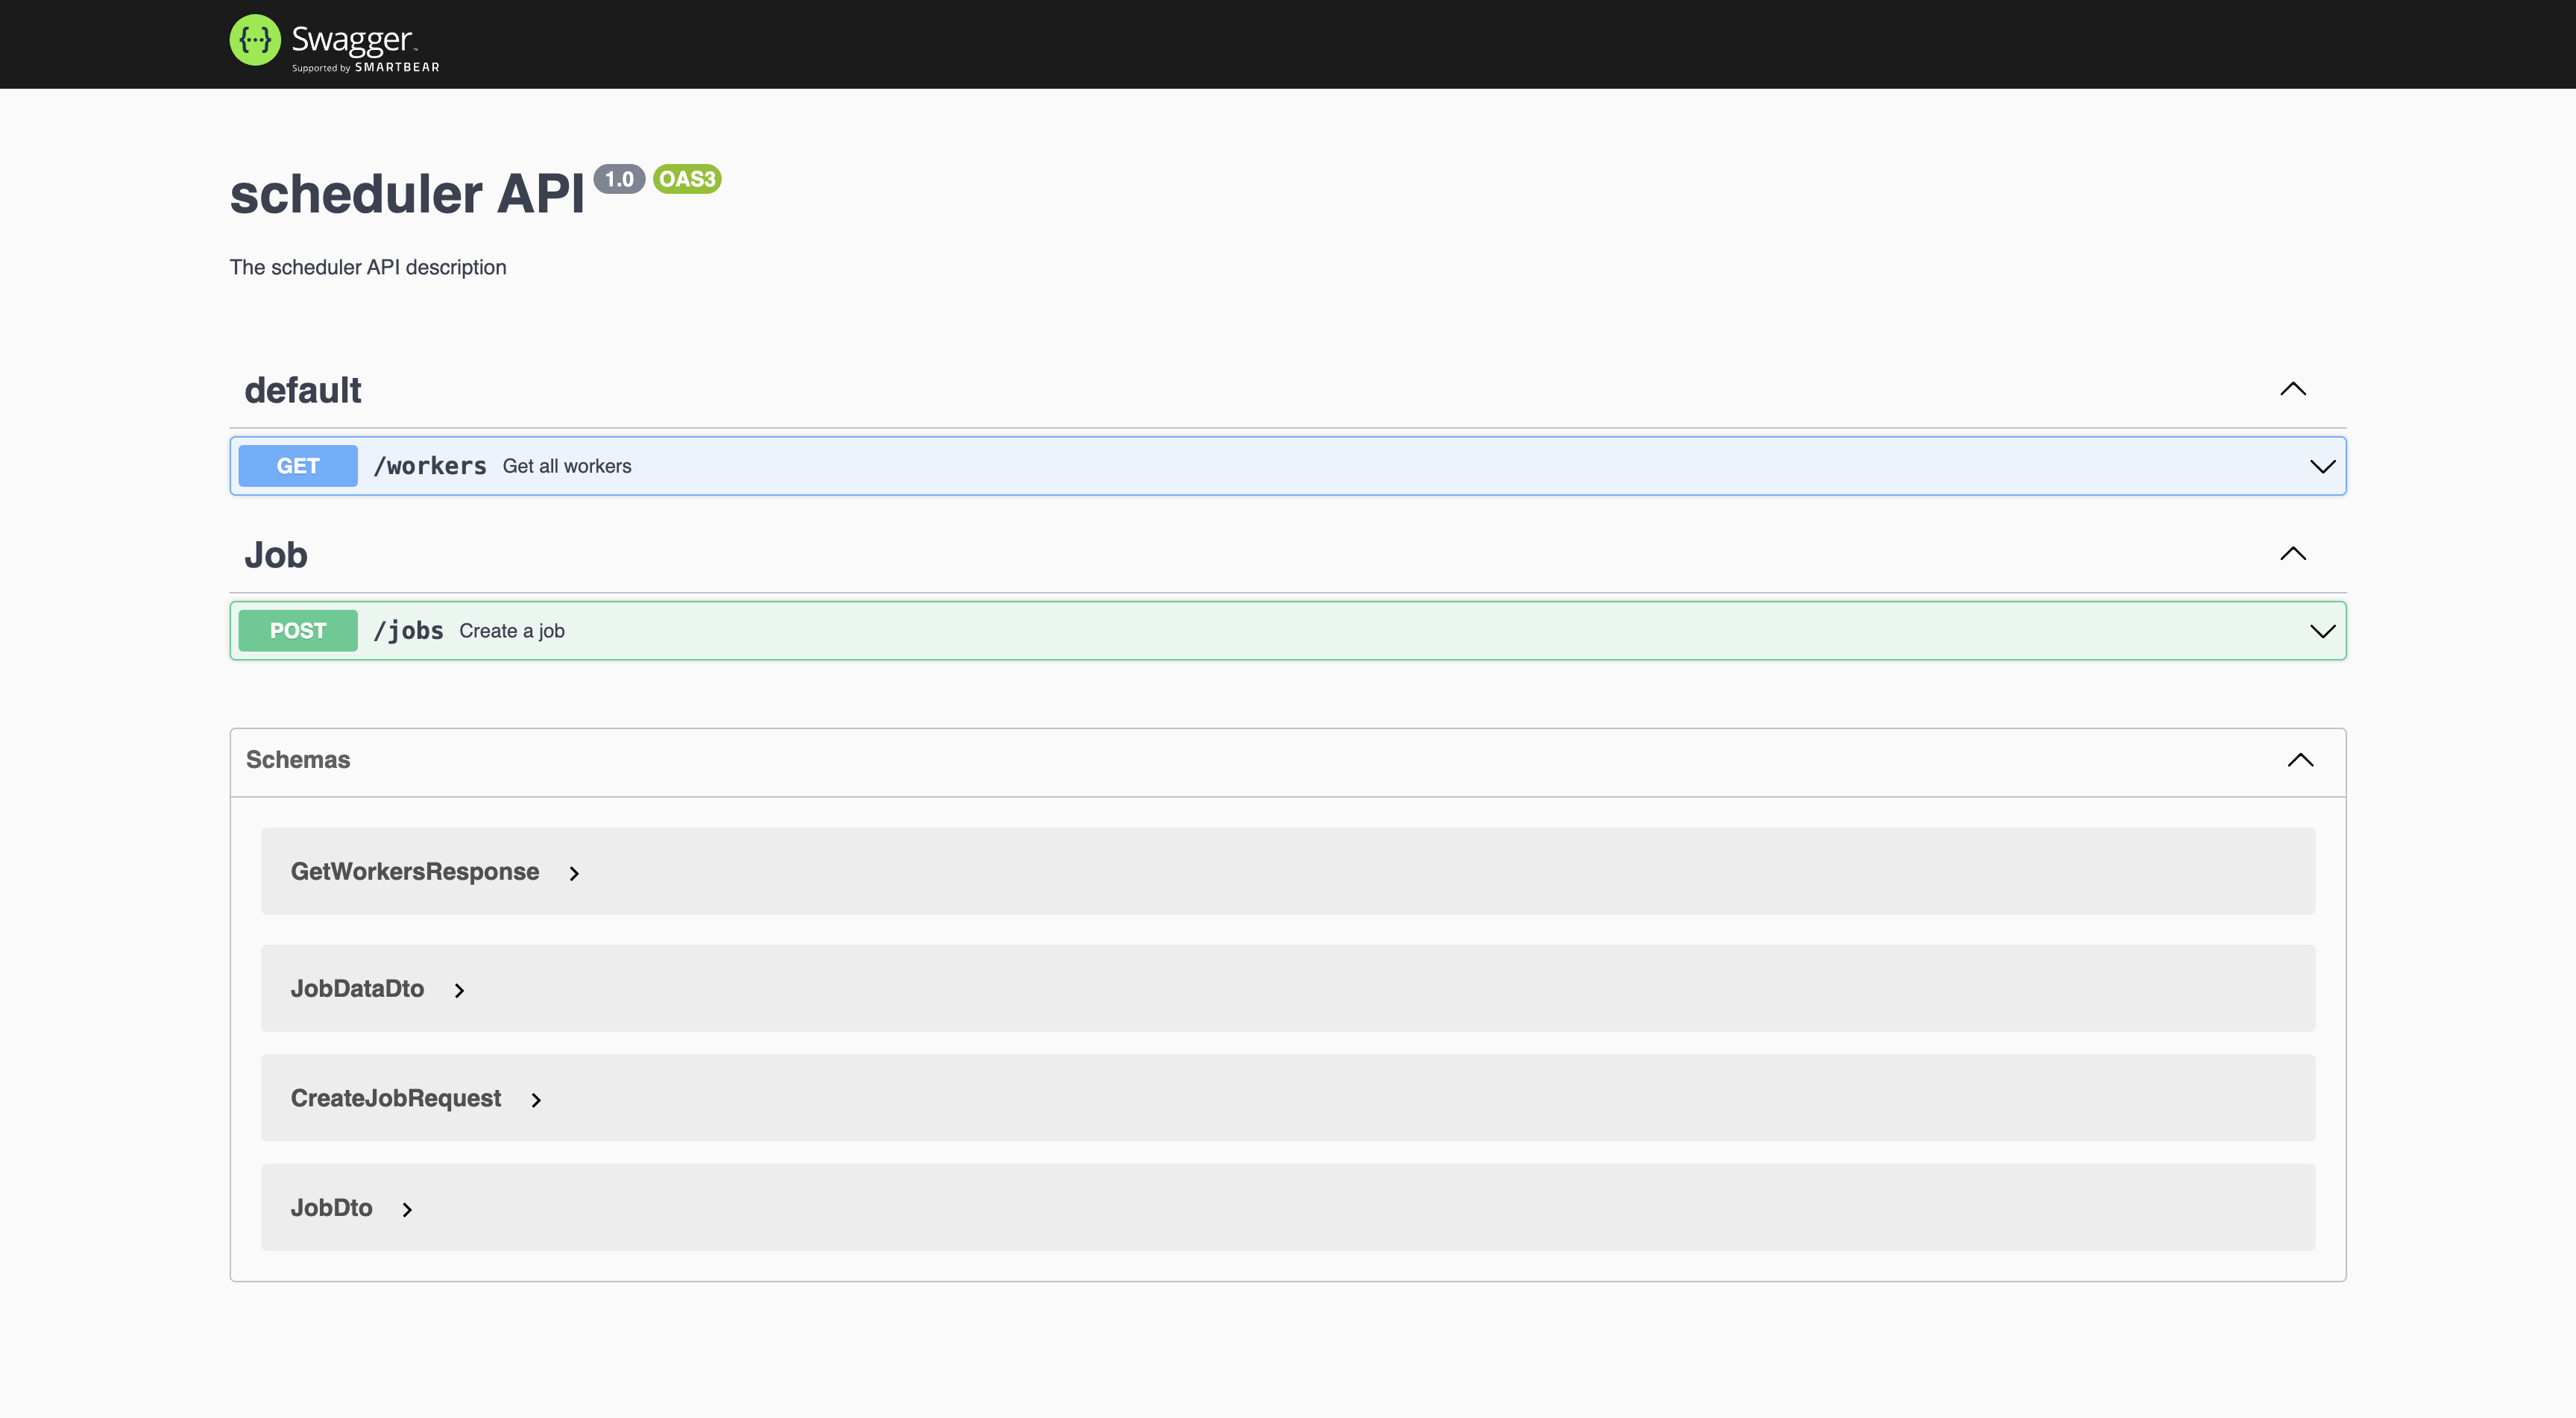
This snippet provides only a glimpse of the controller. The full code includes extra functions for job deletion, retrieving all jobs, and fetching jobs by their respective IDs. Furthermore, it features a Swagger documentation that documents each accessible API for clients.
Worker Module
The worker module plays a crucial role in our system, and its responsibilities encompass:
Listening to the Master's Queue Commands: Workers actively listen to queue commands issued by the master, awaiting instructions on how to process jobs.
Pushing Jobs to the Queue: Workers are responsible for pushing jobs into the queue, ensuring they are ready for execution.
To facilitate these functionalities, we need to set up communication channels for workers to connect to the master and dispatch jobs into the queue. Connection details are defined in the worker.module.ts file:
// src/worker/worker.module.ts
@Module({
  imports: [
    ScheduleModule.forRoot(),
    ClientsModule.register([
      {
        name: 'WORKER_MANAGER',
        transport: Transport.RMQ,
        options: {
          urls: [process.env.AMPQ_URL],
          queue: 'scheduler_master_queue',
          queueOptions: {
            durable: false,
          },
        },
      },
    ]),
    RabbitMQModule.forRoot(RabbitMQModule, {
      exchanges: [
        {
          name: 'scheduler_execution_exchange',
          type: 'direct',
        },
      ],
      uri: process.env.AMPQ_URL,
      connectionInitOptions: { wait: false },
    }),
  ],
  // ... other code
})
export class WorkerModule {}
The
ClientsModule.registermethod establishes a connection to the master's queue. This connection is used for sending and receiving messages to the master. It specifies the transport type as RabbitMQ, and the connection details, including the URL and queue name the master is listening on.The
RabbitMQModule.forRootmethod creates a connection to the RabbitMQ server, which is essential for pushing jobs into the queue. It defines the exchange namedscheduler_execution_exchange, specifying it as a direct type exchange. This exchange is a key part of RabbitMQ and plays a role in routing messages within the system.
By configuring these connections, workers can effectively communicate with both the master and the RabbitMQ server, ensuring the seamless flow of commands and job dispatch in the system.
Worker Service
In the worker service, our initial focus will be on implementing the functions that enable the establishment of a connection with the master and the periodic sending of heartbeats to the master.
// src/worker/worker.service.ts

let connected = false;
export let workerId = randomUUID();

@Injectable()
export class WorkerService {
  constructor(
    private jobScheduleRepository: ScheduledJobRepository,
    private jobRepository: JobRepository,
    protected amqpConnection: AmqpConnection,
    private jobService: JobService,
    @Inject('WORKER_MANAGER') private client: ClientProxy,
  ) {
     @Cron('*/10 * * * * *')
  connectToMaster() {
    if (!connected) {
      try {
        const response: Observable<boolean> = this.client.send<boolean>(
          { cmd: 'registerWorker' },
          {
            workerId: workerId,
          },
        );

        response
          .pipe(
            catchError((err) => {
              console.log(err);
              return of(false);
            }),
          )
          .subscribe((res) => {
            if (res) {
              connected = true;
              console.log('Connected to master!');
            } else {
              console.log('Failed to connect to master!: ' + res);
            }
          });
      } catch (_) {}
    }
  }

  @Cron('*/45 * * * * *')
  sendHeartbeat() {
    if (connected) {
      try {
        const response: Observable<boolean> = this.client.send<boolean>(
          { cmd: 'heartbeat' },
          {
            workerId: workerId,
          },
        );

        response
          .pipe(
            catchError((err) => {
              console.log(err);
              return of(false);
            }),
          )
          .subscribe((res) => {
            if (res) {
              console.log('Heartbeat sent!');
            } else {
              console.log('Failed to send heartbeat!: ' + res);

              //force reconnect
              connected = false;
            }
          });
      } catch (_) {}
    }
  }
  }
}
connectToMaster: This method is scheduled to run every 10 seconds. It attempts to connect to the master by sending a register worker command. If the connection is successful, it sets the connected flag to true.
sendHeartbeat: This method is scheduled to run every 45 seconds. It sends a heartbeat to the master to indicate that the worker is still alive. If the connection is unsuccessful, it sets the connected flag to false and attempts to reconnect to the master.
Now that we have established a connection with the master and are sending heartbeats, we need to implement the logic for processing queue commands received from the master.
@Injectable()
export class WorkerService {
  //... other code
  async queueJobsByShard(params: {
    shard: number;
    timestamp: number;
  }): Promise<number> {
    try {
      const scheduledJobs =
        await this.jobScheduleRepository.getDueScheduledJobs(
          params.shard,
          params.timestamp
        );

      await this.queueJobs(scheduledJobs, params.timestamp);

      return scheduledJobs.length;
    } catch (e) {
      console.log(e);
      return 0;
    }
  }

  async queueJobs(scheduledJobs: ScheduledJob[], timestamp: number) {
    //push each job to queue
    for (let scheduledJob of scheduledJobs) {
      //get the job
      const job: Job = await this.jobRepository.findById(scheduledJob.jobId);

      //queue the job
      this.amqpConnection.publish(
        "scheduler_execution_exchange",
        job.data.name,
        JSON.stringify(job.data.data)
      );

      //mark the jscheduled job as queued
      await this.jobService.markScheduledJobAsQueued(scheduledJob.id);

      //create the next schedule if the job is recurring
      if (job.jobType == JobType.RECURRING) {
        const newSchedule = new ScheduledJob({
          id: randomUUID(),
          shard: scheduledJob.shard,
          jobId: scheduledJob.jobId,
          nextExecution: timestamp + job.interval,
        });
        await this.jobScheduleRepository.add(newSchedule);
      }
    }
  }

  //... other code
}
Pushing Jobs into the Queue The
this.amqpConnection.publishmethod is responsible for pushing jobs into the queue. It requires three essential parameters: the exchange name, the routing key, and the message. The exchange name corresponds to the exchange defined in theworker.module.tsfile. The routing key specifies the queue name that the execution service's workers are monitoring (please note that the details of the distributed job execution service will be covered later in this discussion). The message parameter contains the job data that we intend to enqueue.Queueing Jobs by Shard The
queueJobsByShardmethod handles the processing of queue commands received from the master. It takes two vital parameters: the shard identifier and the current timestamp. This method is responsible for retrieving jobs that are due for execution and are associated with the specified shard. Subsequently, it pushes these eligible jobs into the queue by invoking thequeueJobsmethod.Queueing Jobs The
queueJobsmethod is responsible for the actual task of pushing jobs into the queue. It expects two arguments: the list of scheduled jobs and the current timestamp. The method iterates through the list of scheduled jobs, enqueuing each job into the designated queue. After queuing a job, it marks the scheduled job as "queued" and initiates the creation of a new schedule if the job is recurrent.
At this stage, we are almost ready to proceed. The final step involves exposing an API in the worker.controller.ts file that will allow the master to transmit queue commands to the worker, facilitating efficient job management and execution.
// src/worker/worker.controller.ts

import { Controller } from '@nestjs/common';
import { MessagePattern } from '@nestjs/microservices';
import { WorkerService } from './worker.service';

@Controller()
export class JobQueueController {
  constructor(private queueService: WorkerService) {}

  @MessagePattern({ cmd: 'queueJobs' })
  async queueJobs(params: {
    shard: number;
    timestamp: number;
  }): Promise<number> {
    return await this.queueService.queueJobsByShard(params);
  }
}
queueJobs: This method is responsible for processing queue commands received from the master. It accepts two parameters: the shard identifier and the current timestamp. It retrieves jobs that are due for execution and associated with the specified shard. It then proceeds to push these jobs into the queue by invoking the queueJobs method.
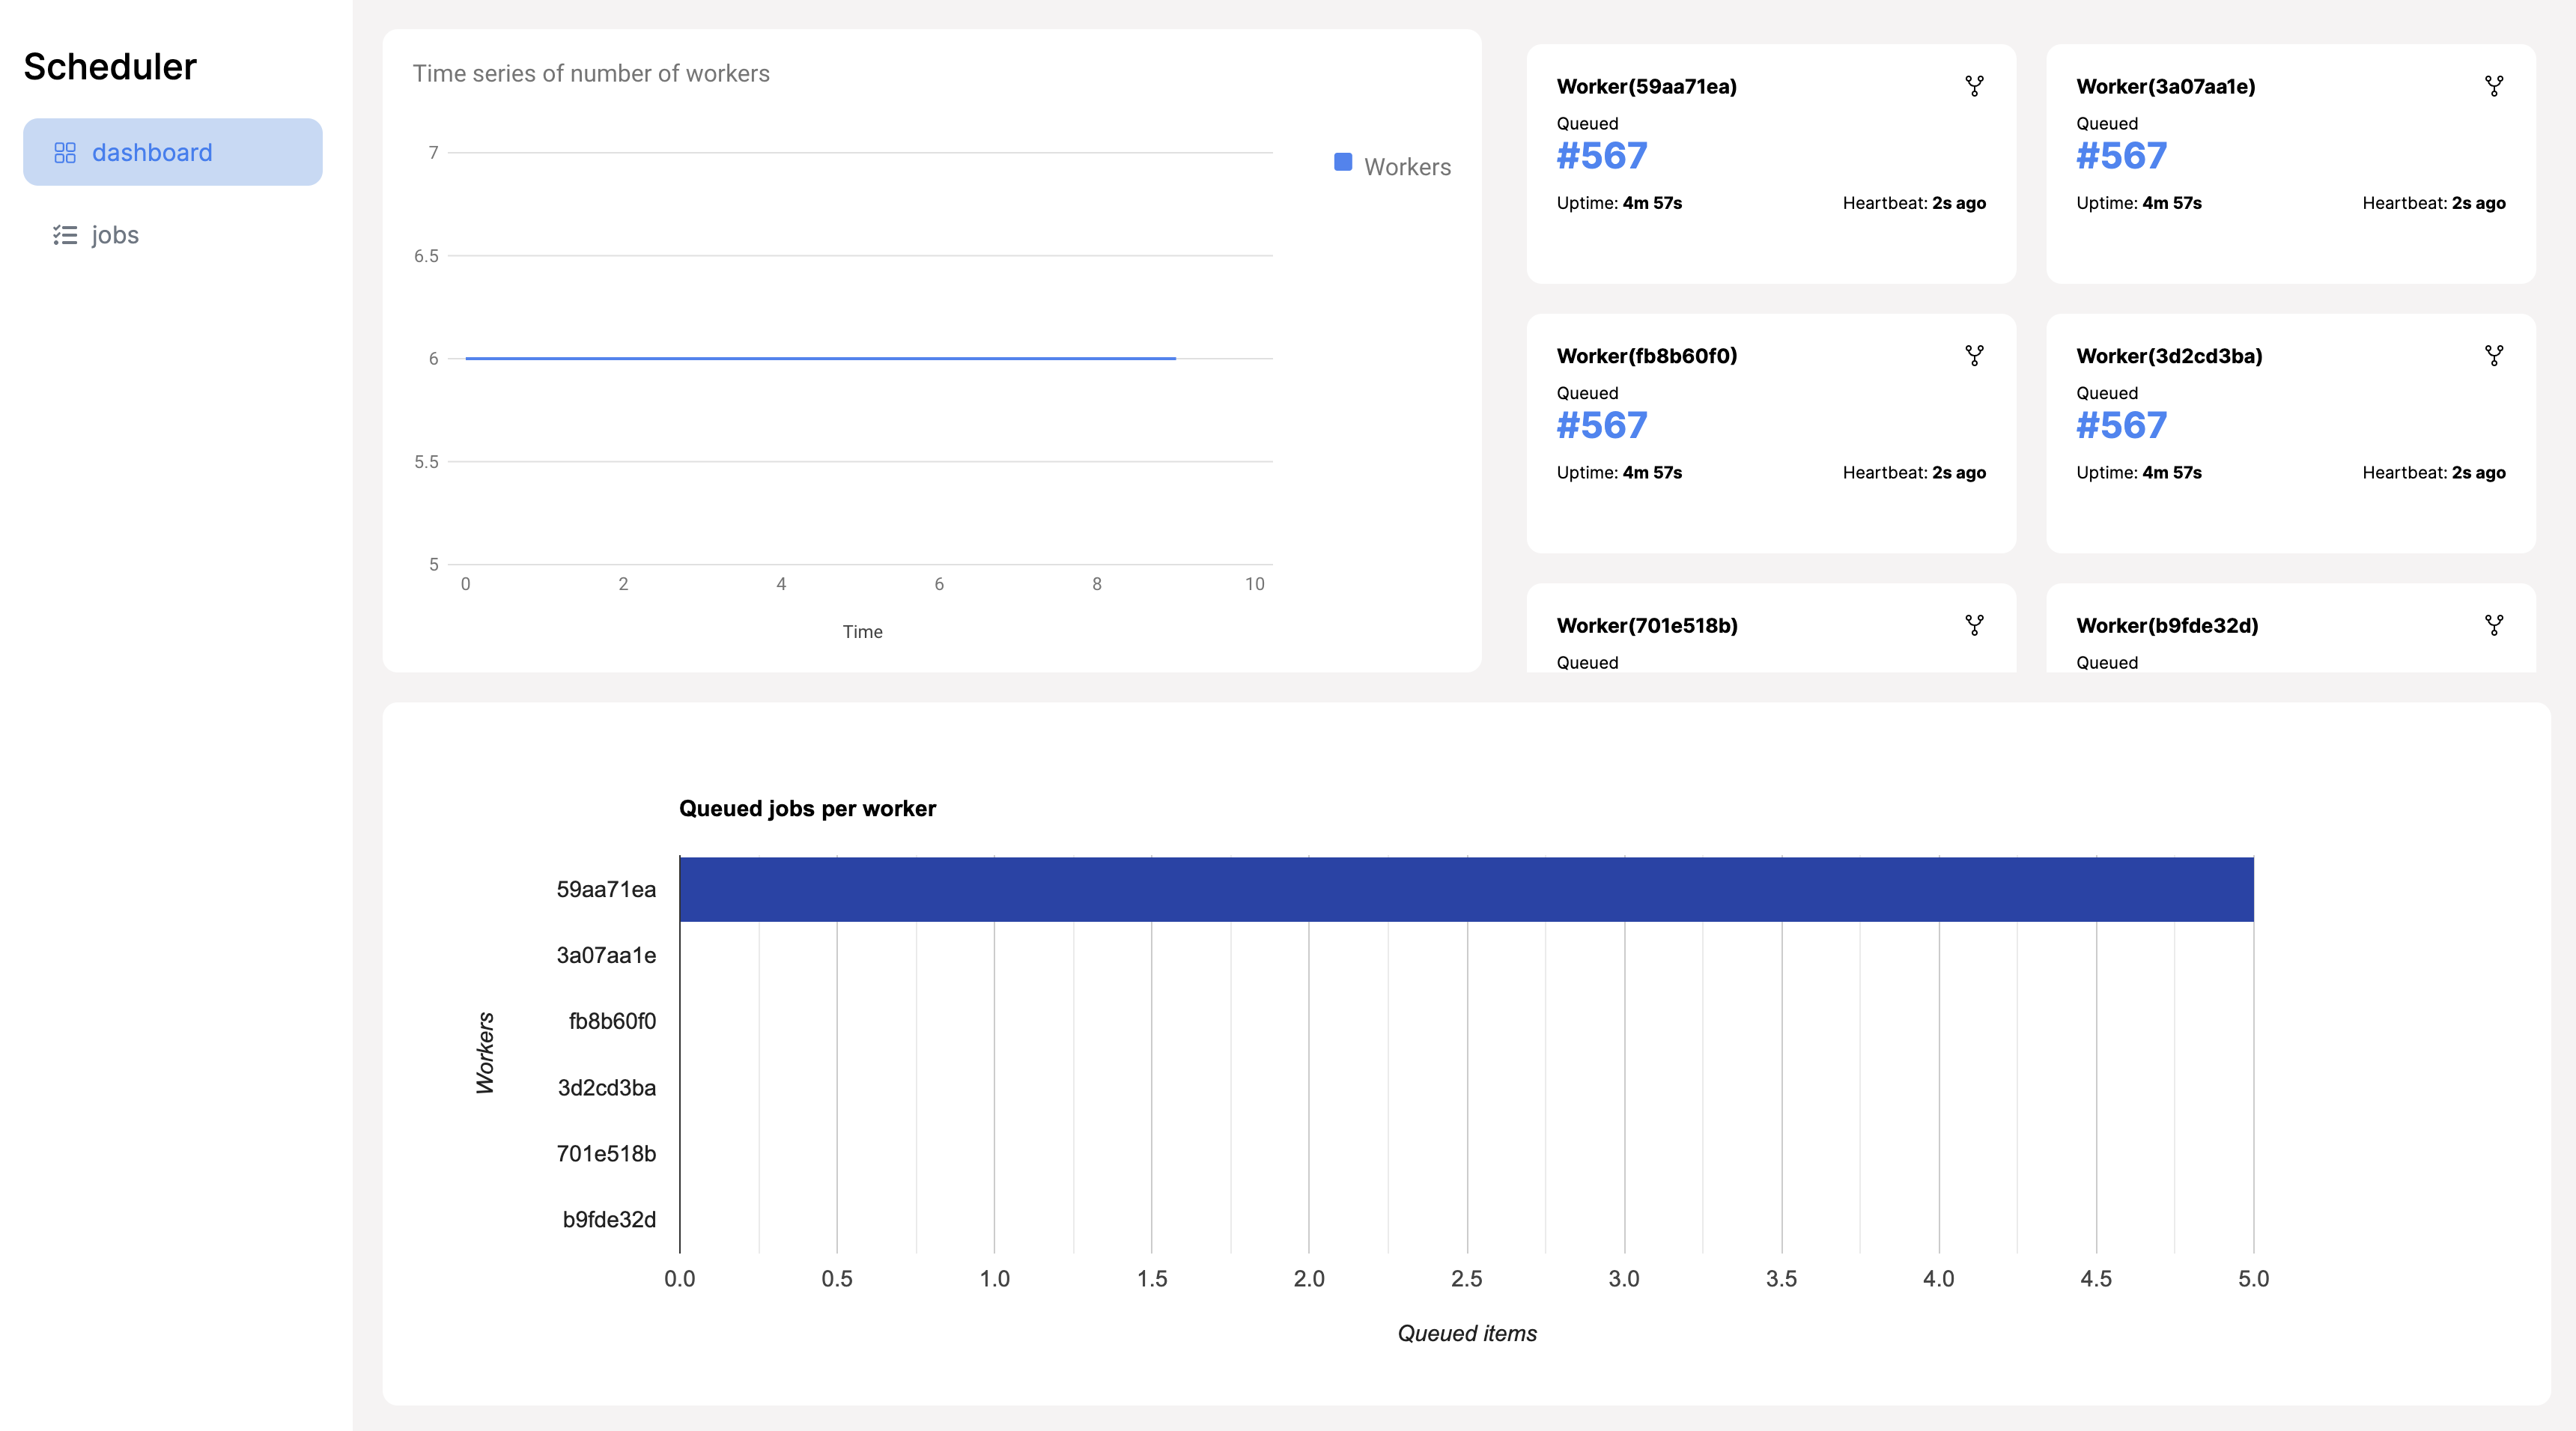
Scheduler client.
Before we conclude, I would like to discuss the scheduler-client application included in the completed code of this article. It is a React-based UI client that enables you to monitor the status and metrics of workers in the scheduling service. Additionally, it provides access to information about created jobs and their schedules.
Conclusion of the Scheduler Service
We have now finished implementing the scheduler service. We've successfully created a distributed job scheduling system capable of managing both one-time and recurring tasks. Furthermore, the system can scale horizontally by integrating additional workers. Our next objective is to proceed with the implementation of the distributed job execution service which will be covered in the next article.
If you got to this point, I would like to thank you for reading this article. I hope you found it informative and useful. If you have any questions or feedback, please feel free to reach out to me on Twitter.
references: